Choosing a file uploader is easy to get wrong in a demo and expensive to get wrong in production. A vendor’s sandbox rarely shows you what happens when a customer on a hotel Wi-Fi network tries to upload a 500MB video, or when 200 people hit “submit” at the same time during a product launch. That gap between demo behaviour and real-world behaviour is exactly what a benchmark is meant to close.
This article lays out a practical, repeatable way to test a file uploader before you build your product around it. You’ll define representative scenarios, control the variables that usually skew results, and score candidates on the metrics that actually predict how they’ll behave once real users and real files are involved.
Think of it as due diligence you’d apply to any other core dependency. You wouldn’t pick a database or a payment processor based on a five-minute demo, and an uploader deserves similar scrutiny, since it sits directly in the path of your users’ most important actions: submitting work, sharing media, or completing a transaction.
Key Takeaways
- A fair benchmark tests reliability, performance, experience, and security together, not just upload speed.
- Representative test scenarios should include worst-case file sizes, poor network conditions, and concurrent uploads at peak load.
- Controlling variables like network conditions, test files, and device types is what makes vendor comparisons valid.
- Reliability metrics such as resume rate and retry behaviour often matter more than raw transfer speed.
- Scoring candidates against weighted priorities turns benchmark data into a defensible decision.
Why Benchmark Before Committing
A file uploader looks simple from the outside: a button, a progress bar, a success message. The complexity lives underneath, in how it handles bad connections, large files, and concurrent traffic. Skipping a structured benchmark means finding out about that complexity after launch, usually from a support ticket rather than a test report.
The Cost of a Wrong Choice
The price of picking the wrong file uploader rarely shows up on day one. It shows up weeks or months later, once the integration is load-bearing.
- Switching later means rework and migration. Once an uploader is wired into your frontend, backend storage, and workflows, replacing it touches every one of those layers again.
- Upload issues surface only under real load. A tool that performs fine with a handful of test uploads can degrade noticeably once dozens of users upload simultaneously.
- Vendor limits appear after integration. File size caps, rate limits, or missing format support are the kind of detail that often only becomes clear once you’re deep into implementation.
What a Good Benchmark Reveals
A structured test does more than confirm a tool “works.” It tells you how it behaves at the edges, which is where most upload problems actually live.
- Real-world reliability, not demo behaviour. Demos are built on stable connections and small files; your users won’t always give you either.
- True performance under poor networks. Mobile networks, public Wi-Fi, and flaky office connections are where uploaders either recover gracefully or fail outright.
- Hidden gaps in security and support. Validation, scanning, and responsiveness from a vendor’s support team are easy to overlook until something breaks in production.
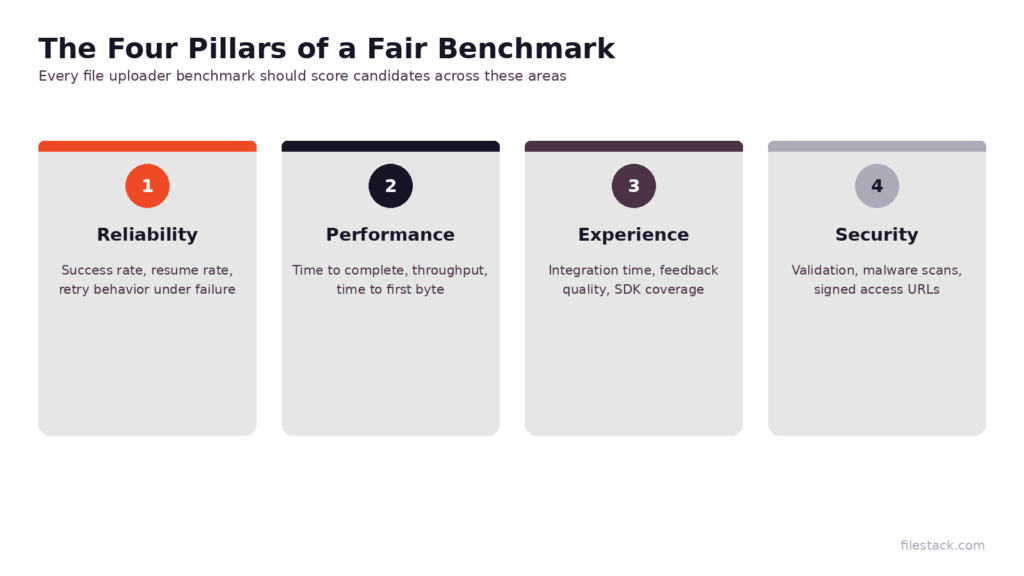
These four areas, reliability, performance, experience, and security, form the backbone of every section that follows. Once you understand why benchmarking matters, the next step is making sure the test itself is fair to every candidate.
Setting Up a Fair Test
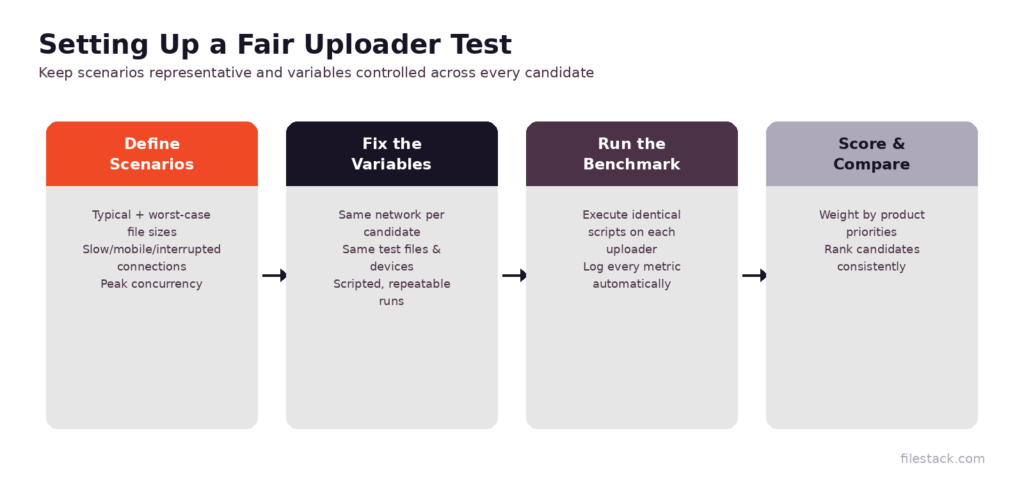
A benchmark is only as useful as its setup. If the test conditions favour one uploader over another by accident, the results won’t hold up once you’re comparing candidates side by side. The two steps below, defining scenarios and controlling variables, are what separate a useful benchmark from a set of numbers that don’t actually mean anything.
Define Representative Scenarios
Your test scenarios should reflect how your actual users will upload files, not just what’s convenient to test.
- Typical and worst-case file sizes. Test the file size your average user will upload, and also the largest file your product realistically needs to support.
- Slow, mobile, and interrupted connections. Simulate 3G-level speeds and mid-upload disconnects, since these are common in real usage even if your own testing environment has fast, stable internet.
- Concurrent uploads at expected peak. Model the number of simultaneous uploads your product might see during a busy period, not just a single-user test.
Control the Variables
Once your scenarios are defined, the goal is to keep every other factor identical across candidates so the differences you measure come from the uploader itself.
- Same network conditions for each candidate. Run every uploader through the identical simulated network profile, ideally back to back, to avoid variance from time-of-day network fluctuations.
- Consistent test files and devices. Use the exact same file set and testing hardware for every candidate so file characteristics aren’t introducing bias.
- Repeatable, scripted runs. Automate the test so it can be run multiple times with identical inputs, which helps you catch inconsistent results rather than one-off flukes.
With scenarios defined and variables controlled, you’re ready to decide what to actually measure.
Metrics That Actually Matter
It’s tempting to reduce a file uploader benchmark to a single number, like average upload speed. That number alone won’t tell you much about how the uploader will hold up in production, especially once you account for the file upload benchmark metrics that actually correlate with user-facing problems. A useful benchmark tracks metrics across three areas: reliability, performance, and experience, and treats them as equally important rather than ranking speed above everything else.
Reliability Metrics
Reliability metrics tell you what happens when conditions aren’t ideal, which is the scenario your production traffic will eventually hit.
- Success rate under packet loss. Simulate a percentage of dropped packets and measure how many uploads still complete successfully.
- Resume rate after interruption. For resumable upload testing, disconnect mid-upload and check whether the upload picks up where it left off or restarts from zero.
- Retry behaviour and failure recovery. Look at how the uploader handles failed chunks or requests, and whether retries are automatic or require user intervention.
Performance Metrics
Performance metrics capture speed and throughput, but they need to be measured under conditions that resemble production traffic, not a single clean test run.
- Time to complete by file size. Measure completion time across your small, medium, and large test files separately, since performance doesn’t scale linearly.
- Throughput under concurrency. For concurrent file upload testing, track how completion times shift as you increase the number of simultaneous uploads.
- Time to first byte of delivery. If files need to be accessed immediately after upload, measure how quickly they become available for delivery or processing.
Experience Metrics
Experience metrics are easy to underweight in a benchmark, but they directly affect how long integration takes and how much ongoing support your team will need.
- Integration effort and time to first upload. Track how long it takes a developer unfamiliar with the tool to get a working upload flow running.
- Quality of progress and error feedback. Check whether the uploader surfaces clear, actionable error messages or leaves users staring at a stalled progress bar.
- SDK and documentation coverage. Review whether SDKs exist for your stack and whether the documentation actually matches current behaviour.
Performance and reliability numbers only tell part of the story. The other part is whether the uploader can be trusted with the files themselves.
Testing Security and Compliance
Speed and reliability matter, but a file uploader is also a gateway into your infrastructure. Every file that comes through it eventually touches your storage, your servers, or your users’ devices, which makes validation and access control part of any serious secure file upload testing process, not an optional add-on.
Validation and Protection
These checks confirm the uploader is enforcing rules server-side, not just in the browser where they can be bypassed.
- Server-side type and size enforcement. Attempt to upload disallowed file types or oversized files directly through the API to confirm client-side rules aren’t the only line of defence.
- Virus and malware scanning behaviour. If scanning is part of the offering, test it with known-safe test files that trigger antivirus signatures to confirm detection actually works.
- Signed, expiring access to uploads. Check whether uploaded files are protected behind signed URLs with expiration, rather than being publicly accessible by default.
With performance, reliability, experience, and security data in hand, the last step is turning all of it into an actual decision.
Scoring and Making the Call
Raw benchmark data is only useful once it’s organised into something you can compare and defend. This is where a scoring framework earns its place in the process, turning pages of test logs into a comparison your whole team can look at and agree on.
Turn Results Into a Decision
A simple weighted scoring model keeps the decision grounded in your product’s actual priorities instead of whichever metric looks most impressive.
- Weight metrics by product priorities. A consumer app handling large media files might weight reliability and resumability more heavily than a tool handling small document uploads.
- Score each candidate consistently. Use the same 1-10 scale (or similar) across every metric and every candidate to keep comparisons meaningful.
- Validate cost against projected volume. Run the numbers at your expected upload volume, not just the vendor’s advertised starting price, since costs can shift significantly at scale.
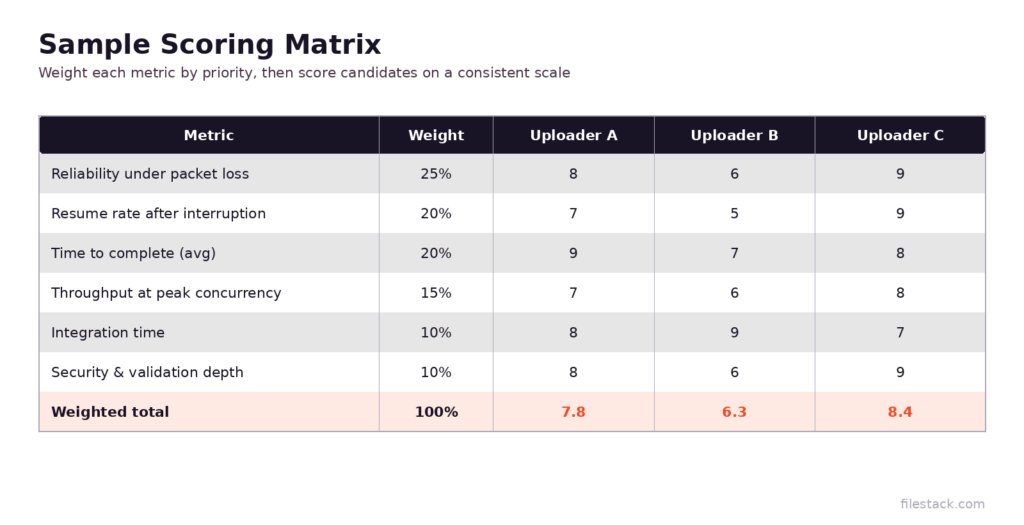
A scoring matrix like this makes it easier to see not just which uploader “wins,” but where each one falls short relative to what your product actually needs.
Where a Managed File Uploader Fits
After running a benchmark like this, a pattern usually becomes clear: the uploaders that score well across reliability, performance, and security tend to be the ones that handle the hard parts by default, rather than leaving them for your team to build. That’s a useful signal in itself when you’re trying to compare file upload solutions and only have limited time to test each one in depth.
What to Expect From a Strong Option
These are the baseline capabilities worth checking for in any candidate that performs well in your benchmark:
- Resumable uploads and retries by default. Interrupted uploads should resume automatically rather than requiring custom retry logic on your end.
- Built-in validation, scanning, and delivery. File type checks, malware scanning, and content delivery should be part of the offering, not something bolted on afterwards.
- SDKs that shorten integration time. Well-maintained SDKs across common frameworks reduce the engineering time needed to get from prototype to production.
A file uploader built around these defaults tends to hold up better once real users and real file volumes are in the mix, which is ultimately what a benchmark is trying to predict.
Conclusion
A file uploader is one of those components that seems interchangeable until you’re the one debugging why uploads fail on a customer’s mobile connection at 2 AM.
Running a structured benchmark, one that tests reliability, performance, experience, and security under conditions that resemble your actual users, gives you a much clearer picture than a quick demo ever could.
It also gives you something more valuable than a gut feeling: a scored, defensible reason for the choice you eventually make.
FAQs
Which upload metrics matter most?
Reliability metrics, like success rate under poor conditions and resume rate after interruption, tend to matter more than raw speed, since they reflect what happens during real-world usage rather than a single ideal test run.
How do I simulate poor network conditions?
Use network throttling tools or browser dev tools to cap bandwidth and introduce latency, and consider tools that can simulate packet loss or mid-upload disconnects for more realistic file upload load testing.
How do I test upload reliability fairly?
Run the same scripted scenarios, including interruptions and retries, against every candidate under identical simulated network conditions so the results reflect the uploader’s behaviour rather than test variance.
What security checks should a benchmark include?
At minimum, test server-side file type and size enforcement, malware scanning behaviour if offered, and whether uploaded files are protected by signed, expiring URLs rather than public access.
How do I compare upload performance across vendors?
Measure time to complete, throughput under concurrency, and time to first byte across identical file sizes and network conditions for each candidate, then compare the results side by side rather than relying on vendor-published benchmarks.
How do I factor cost into the decision?
Project your expected upload volume and file sizes forward, then estimate cost at that scale for each candidate rather than comparing entry-level pricing alone.
How many test files and sizes should I use?
A reasonable starting point is three to five file sizes spanning your typical to worst-case range, tested across at least two or three network conditions, run multiple times for consistency.
What does a managed file uploader provide by default?
Strong options typically include resumable uploads, automatic retries, built-in validation and scanning, and SDKs across common frameworks, reducing the amount of custom infrastructure your team needs to build and maintain.